This is a guide to how Bill (elpaharo) and I enabled my Wersi Nova CD organ to control many pistons within the MidiTzer(c) Style 216 Virtual Theater Organ Program. I want to acknowledge that without Bill's help it is unlikely that I would have been successful.
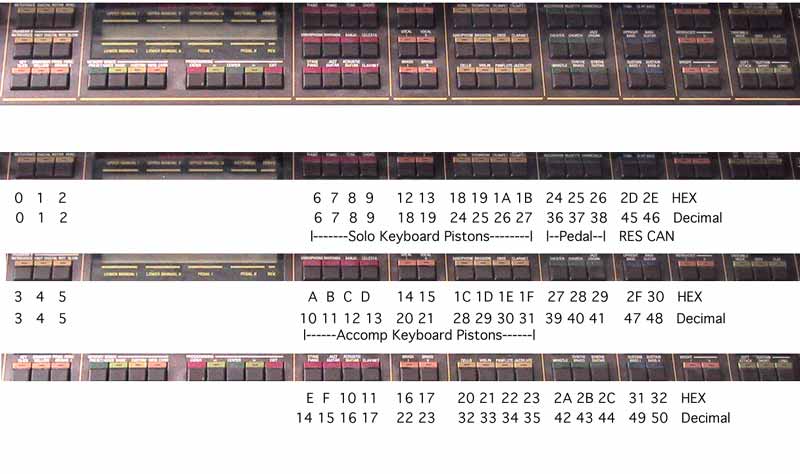
First - a picture of most of the Wersi buttons: |
||||||
![]() |
||||||
Next, a detail of these buttons. Underneath each button is the Hex signal sent via midi. Under the Hex numbers is the Decimal equivalent. Finally, I indicate which MidiTzer(c) Style 216 piston each Wersi button is to access. | ||||||
![]() |
||||||
The above information was obtained using the free program - Midi-Ox(c). One of the program's functions is to list each incomming midi message (Wersi midi out). Using this, I was able to determine what each button on the Wersi was sending. It should be noted that not all buttons send a midi message. Additionally, the buttons only send a single midi message unlike the note on/note off message sent when a key is pressed/released. | ||||||
Another Midi-Ox(c) function is to change an incomming midi signal. This is accomplished via the mapping function. To complete all the steps outlined herein one needs to first download and install the MIDI Yoke(c) program. Both programs are available free here. | ||||||
The following description of using Midi-Ox and MIDI-Yoke to map the midi data is taken from Bill's (elpaharo) document "The Challenge" with additional comments by me in navy blue:
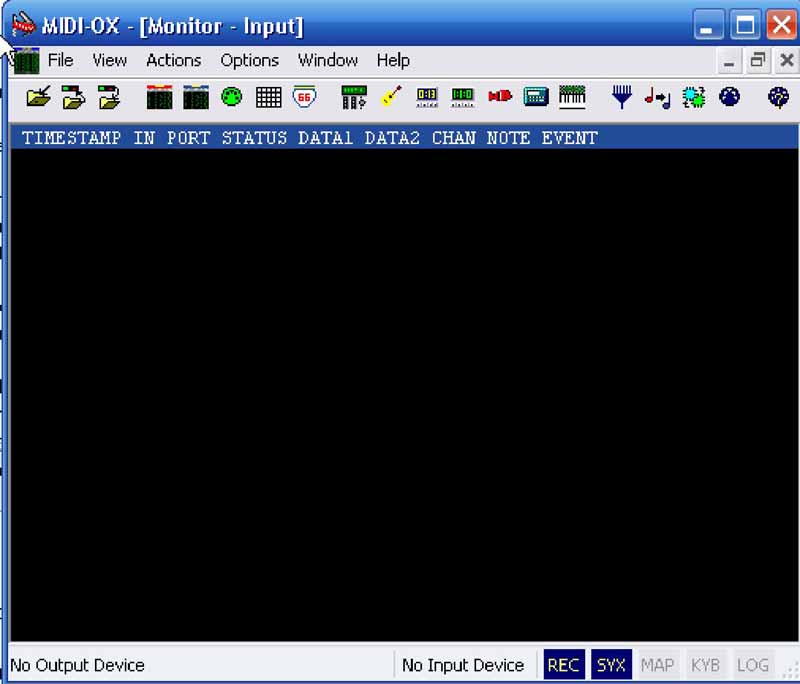
Ok, open Midi-OX. You will get a screen similar to that seen below. |
||||||
![]() |
||||||
From the Options tab select Data Mapping: | ||||||
![]() |
||||||
We will see the following screen: | ||||||
![]() |
||||||
Select Insert: giving us the mapping window. | ||||||
![]() |
||||||
Now we must define the Midi Message that we are watching for, "18".
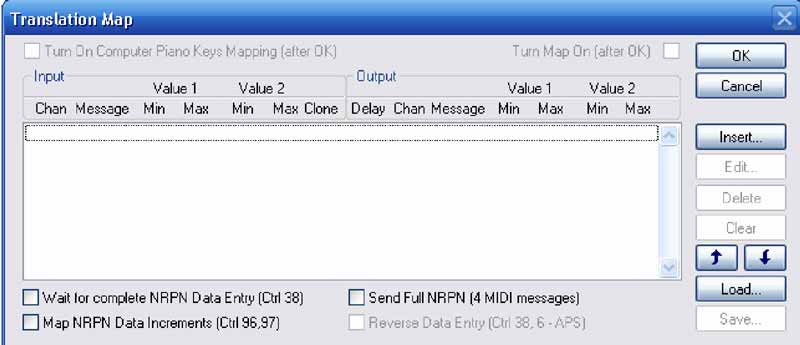
18 is the hex from the organ - this translates to 24 decimal which is needed by MidiTzer(c). Therefore we set "When Input matches" as follows: Channel = 1, Event Type = ProgChg, Min = 24, and Max = 24 (Max has not yet been set to 24 in the above example). Leave the "Not Used" part as is. Next we set "Set Output" as follows: Channel = 16, Event Type = ProgChg, Min =0, and Max =0 (0 relates to the "p" piston under the solo manual). Leave the "Not Used" part as is. |
||||||
Next, select OK and then click the Turn Map On box in the upper right corner: | ||||||
![]() |
||||||
Click OK then open Options window - pull down to MIDI Devices and release. You will get the following window (assuming you have previously installed MIDI Yoke). | ||||||
![]() |
||||||
In this example the organ is connected to the computer via a Turtle Beach USB interface as shown in the first sub-window. In the next sub-window down you select "Out to MIDI Yoke: 1". Additionally you will need to press the + button in the "Port Mapping" sub-window and select "Out To MIDI Yoke: 1" if it isn't already shown in the window. If there is more than one item in this sub-window, select "Out To MIDI Yoke: 1". Click OK then close the window.
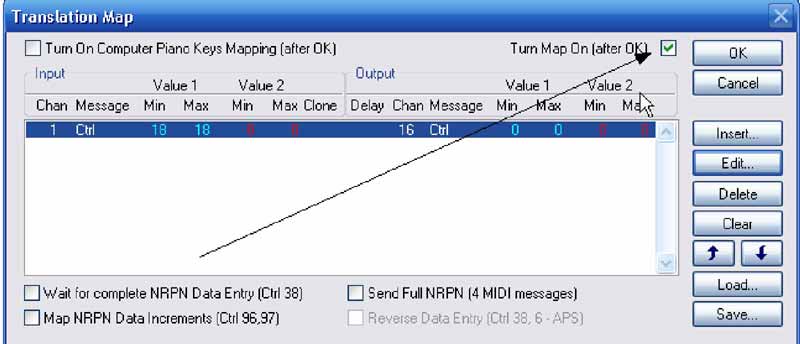
Now it is a good idea to go back to the Translation Map window and save the file using a name you will recognize for this organ's set up. |
||||||
Next we must map Miditzer to use Midi Yoke 1: | ||||||
![]() |
||||||
Now, remember that Midi-Ox must be runninig before you open Miditzer to play the organ.
If this test works, map all your buttons. Also, NOTE, I assumed that your 18 was a hex digit and, therefore, use 24 dec inside the mapping software. That area uses decimal in the mapping so convert your hex into decimal for the map. |
||||||
Note: the above picture is from MidiTzer(c) Style 260, but you can easily use it to set up the Style 216 as well.
Leaving the Midi-Ox program running, turn on the MidiTzer(c) program, engage a number of stop tabs then press the first Orchestra button on the Wersi. It should have engaged the "p" button under the Solo Keyboard. On my Wersi once in a while I need to select preset/basic then select a preset to get the buttons to send out the appropriate midi message. I normally turn on the Wersi, select the basic preset and select a preset before opening MidiTzer(c) Style 216. I have set up my Wersi so that the pistons under the Solo Keyboard are selected from the first 10 top row buttons to the right of the display window. The next 3 buttons on that row are for the pedal pistons (not traps) and the last 2 buttons of this row are for RES and CAN. The second row of buttons to the right of the display window are set to operate the pistons under the Accomp Keyboard (first 10 to the right of the display window) In my configuration, I have used half of the available buttons. I suspect that soon I will find good use for the other 25. The following are the assignments for various pistons within MidiTzer(c) Style 216: 0 thru 9 (decimal) are for the Solo Keyboard p, mf, f, ff, fff, 1, 2, 3, 4, and 5. 10 - 19 are for the Accomp Keyboard p, mf, f, ff, fff, 1, 2, 3, 4, and 5. 20, 21 & 22 are the three pedal pistons ped 1, ped 2, & ped 3. 123 is for the RES piston and 124 is for the CAN piston. For the MidiTzer(c) Style 260, you will have to remap things a bit. If you need this information email me here. Using the Translation Map window within Midi-Ox, map each of the Wersi buttons you wish to use to the appropriate MidiTzer(c) pistons. Be sure to save your work and remember to have Midi-Ox running before opening MidiTzer(c). Good Luck and have fun!!! |
||||||